
Welcome to our step-by-step guide on how to properly remove your Nest thermostat! Whether you’re upgrading to a newer model or simply need to relocate it, we’ve got you covered. With its sleek design and intelligent features, the Nest thermostat has become a household name in energy efficiency and convenience. However, removing it might seem like a daunting task if you’ve never done it before.
Fret not! In this blog post, we’ll walk you through each crucial step so that you can dismantle your Nest thermostat with ease and confidence. So grab your tools and let’s get started on this hassle-free journey towards disassembling your trusty companion!
Table of Contents
Introduction to Nest Thermostat
If you’re looking to upgrade your Nest Thermostat or simply need to remove it for some reason, this guide will show you how to do so properly. Removing your Nest Thermostat is a pretty simple process, but there are a few things you’ll want to keep in mind to avoid any damage.
First, if your Nest Thermostat is mounted on a wall, you’ll need to remove the mounting plate before removing the actual device. To do this, simply unscrew the two screws that hold the plate in place and gently pull it away from the wall. Once the plate is removed, you can then unplug the Nest Thermostat from the wall outlet.
Next, you’ll need to unscrew the four screws that hold the Nest Thermostat to the backplate. Be careful not to lose these screws, as they are specific to the Nest Thermostat and aren’t easily replaced. Once all four screws are removed, gently pull the Nest Thermostat away from the backplate.
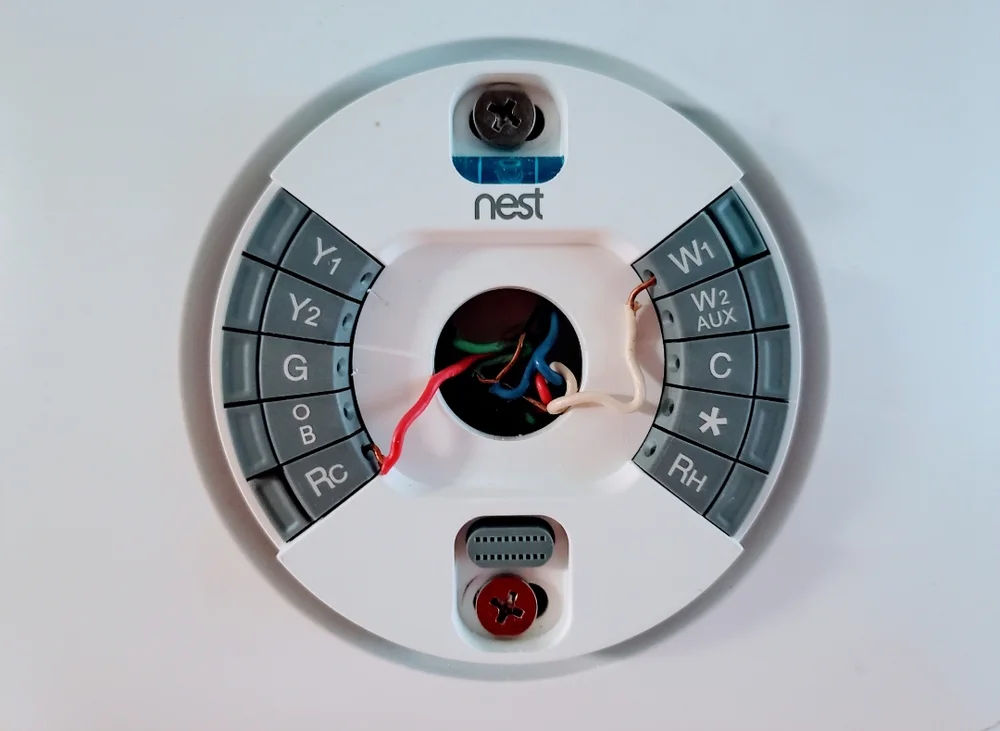
Now that your Nest Thermostat is free from both the wall and backplate, simply disconnect any wires that may still be connected to it. Once all wires are disconnected, your Nest Thermostat is successfully removed and can be replaced with a new one or stored away safely.
Necessary Safety Considerations
When removing your Nest Thermostat, there are a few safety considerations to keep in mind. First, be sure to turn off the power to your thermostat at the breaker box before beginning. Next, remove the batteries from your Nest Thermostat and disconnect any wired connections. Use a soft cloth to avoid scratches when removing the base plate from your wall.
Step-by-Step Guide for Properly Removing a Nest Thermostat
If you’re Nest thermostat is no longer working properly, or if you’re simply ready to upgrade to a newer model, you’ll need to remove your current Nest thermostat from the wall. This can seem like a daunting task, but with our step-by-step guide, you’ll have your old Nest thermostat uninstalled in no time!
To start, locate the two screws at the bottom of your Nest thermostat. Using a Phillips head screwdriver, unscrew these two screws and carefully pull your Nest thermostat away from the wall. Next, locate the metal connector on the back of your Nest thermostat. This is what connects your Nest thermostat to your home’s electrical system.
Using a flathead screwdriver, gently pry the metal connector off of the back of your Nest thermostat. Remove any remaining adhesive from the wall where your Nest thermostat was mounted using a putty knife or razor blade. And that’s it! You’ve now successfully removed your old Nest thermostat.

Disconnecting the Power Source
If you’re moving and need to take your Nest Thermostat with you, the first thing you’ll need to do is disconnect it from the power source. This process is fairly simple, but there are a few things you need to keep in mind to ensure that it’s done properly.
First, locate the Nest’s connector base on the wall. You’ll see two small metal tabs on either side of the base – these are what you’ll use to release the power cable. Gently press each tab in and pull the cable out from the base.
Once the power cable is disconnected, you can unscrew the Nest Thermostat from its mount on the wall. Be sure to keep track of all the screws and hardware so that you can reassemble everything when it’s time to reinstall the Thermostat.
With the power source disconnected and the Thermostat removed from its mount, you’re now ready to safely transport it to your new home.
Removing the Wall plate
Before beginning, make sure that you have the correct tools for the job. You will need a small Phillips head screwdriver and a flat head screwdriver.
To remove the wallplate, start by removing the two screws at the top of the plate with your Phillips head screwdriver. Then, using your flat head screwdriver, gently pry the bottom of the plate away from the wall. The plate should come off easily. If it does not, check to make sure that all screws have been removed before proceeding.
Once the plate is removed, disconnect the Nest Thermostat from its power source by pulling out the connector at the bottom of the device. Be sure to hold on to the thermostat base so that it does not fall and break.
When it is disconnected, the wallplate is now free and can be stored away for future use.
Unscrewing and Taking off the Thermostat Body
To remove your old Nest thermostat, start by unscrewing and taking off the thermostat body. Be careful not to damage the wires. Once the body is off, unscrew the base plate and gently pull it away from the wall. Again, be careful not to damage the wires. Remove the wire nest (the metal ring that holds all the wires in place) by gently pushing it up and out of the hole in the wall.
Recycling or Disposal of the Components
When it comes time to remove your Nest Thermostat, there are a few things you need to take into consideration. Should you recycle or dispose of the components? How will you properly and safely remove the unit from your wall?
Recycling:
The majority of the materials in your Nest Thermostat can be recycled, with the exception of the battery. To recycle your Nest Thermostat, simply follow these steps:
- Unscrew the baseplate from the wall using a Phillips head screwdriver.
- Remove the display from the baseplate.
- Separate the back cover from the display by gently prying it off with a flat head screwdriver.
- Remove the nest thermistor from its housing on the back cover.
- Remove any additional screws holding together any remaining parts of the device and carefully pull it apart. Sort all materials according to their recyclability (plastic, metal, glass).
- Dispose of the battery in accordance with your local recycling guidelines—often this means throwing it away in a designated hazardous waste container at your nearest recycling center .

Disposal:
If recycling is not possible, you should consider disposing of the Nest Thermostat responsibly. To do so safely, follow these steps:
- Unscrew the baseplate from the wall using a Phillips head screwdriver.
- Remove the display from the baseplate.
- Separate the back cover from the display by gently prying it off with a flat head screwdriver.
- Remove the nest thermistor from its housing on the back cover.
- Disassemble all components and place them in separate sealed plastic bags for safe disposal in accordance with your local laws and ordinances.
- Place any hazardous materials—such as batteries—in their own container and dispose of it accordingly
Tips for Easier Removal Process

- If you need to remove your Nest Thermostat for any reason, there are a few tips that can make the process easier.
- First, be sure to power down your Nest by turning off the breaker or removing the batteries. This will help avoid any potential damage during removal.
- Next, use a putty knife or similar tool to gently pry the Nest off of its baseplate. Be careful not to damage the baseplate as you may need to reuse it later.
- Once the Nest is free from the baseplate, you can carefully disconnect the wires from the back of the unit. Make note of which wire goes where so you can easily reconnect them later.
- With the wires disconnected, you should now be able to lift the Nest away from its mount. If there are any adhesive pads or other materials attaching it, be sure to remove those as well so they don’t damage your Nest when reattaching it later.
Alternatives to Nest Thermostat
If you’re looking for an alternative to the Nest Thermostat, there are a few options available on the market. The Honeywell Lyric is one option that offers similar features to the Nest, including the ability to control your home’s temperature from your smartphone. Another option is the ecobee3, which offers a built-in occupancy sensor that can help save energy by only heating or cooling your home when someone is present.